


Demo Lesson Tips!
Common Core State Standard posted
- Post your objective and the Common Core State Standard. Plan your lesson based on one of the Common Core State Standards. See Hundreds of Reading Lesson Plans and get CCSS Question Stems.
Objective posted and explained
- Read the objective aloud to the class, and explain to the students what they will be doing and WHY. **Be sure your objective matches your activities!** Here is how to write a great objective: Write Objectives. Prepare for potential ELLs! Visit content and language objectives!
Lesson idea
- As an FYI, for grades 3 and up, you can’t go wrong by teaching close reading strategies – Close Reading. Find a short story and teach it using the chart below. Pre-teach vocab., then give them a few minutes to read the text independently for gist, do the close reading strategy steps together, and gradually let them be more independent with a partner checking each other’s notes. You always want to have a lesson that involves interaction. If teaching a text to a small group, use this: Reading Strategies.
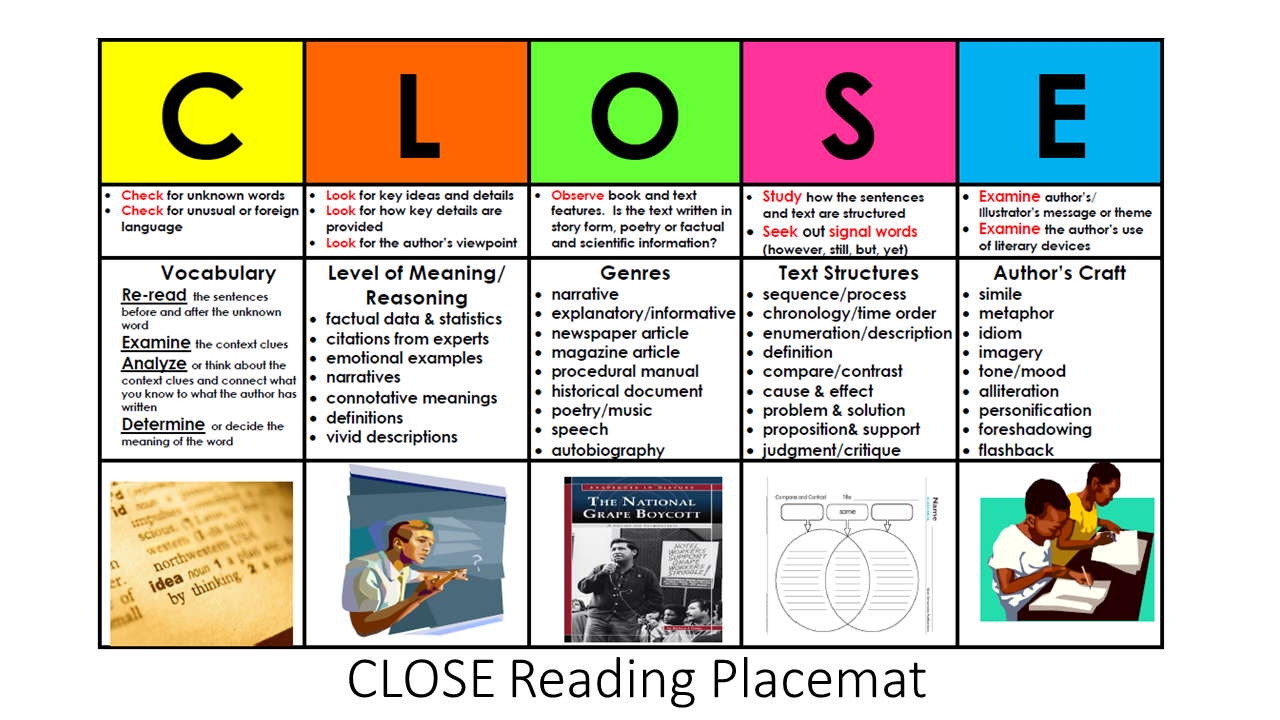
This mat is free on Teachers Pay Teachers.
Visuals
- Pre-teach any tricky new words with VISUALS ~ use pictures from Google Images or actual objects and maybe even physical gestures that the students learn and repeat after you! Say the word, define it, and have the students repeat it using gestures. These are excellent strategies for all students, including ELLs. See my RETELL page for more. Break longer words apart into syllables and put these on the board for students to refer to when stuck. Maybe have students make gestures as they read when encountering the new words with a thumbs up.
- Your posted objective and new vocabulary words should be large enough to be seen from across the room.
Technology
- Incorporate technology ~ maybe create a PowerPoint or even use music ~ so bring in your laptop because the teaching classroom may not be equipped! You can always write how to modify this lesson using the school’s technology on your lesson plan.
Come back to vocabulary at the end of the lesson
- At the end of your lesson, revisit the new words to see if children retain their meanings. Then, perhaps have them define a new word as their “exit ticket” (see the last bullet).
Maintain discipline
- When you teach, remind students, “Eyes on me.” If students are whispering to each other, give a nonverbal cue (maybe 2 fingers up), smile, and say, “I’m going to wait,” and wait. You need to have the class under your control. 🙂
- Be sure to give the students wait time to collect their thoughts.
Use “I do, we do, you do”
- I DO, WE DO, YOU DO! Always teach a new skill this way! First, YOU model and think aloud. Then, gradually release responsibility by getting students involved with support. Finally, have them do it on their own.
Movement
- Give the students opportunities to stand and move. Again, my RETELL page has many interactive strategies to choose from.
Call students by name
- When you call on a student, have him say their NAME before answering. Try to remember names OR start the lesson off by having each child write their name on a folded index card large enough for you to see. The students display their names on their desks. Call students by name!
Circulate the room, giving positive, encouraging comments
- CIRCULATE the room as you teach! Again, call the students by their names to establish that connection. Make specific, positive, thoughtful, and encouraging comments rather than “good job.”
Tap into 4 modalities
- 4 Learning Modalities: Incorporate the 4 learning modalities/into your teaching to reach all learners!
Find a song that goes with your lesson
- Google content area songs. Perhaps leave the class with a song or poem that sums up the lesson!
Use “turn and talk”
- When you have a question to ask the students, incorporate a turn and talk briefly, and then have various pairs raise hands to share out. This way, ALL students must be engaged. Comment on the thoughtful talk that you overheard or clear up misconceptions.
Use “every pupil response” – like thumbs up/down – to check for understanding
- Have frequent opportunities to check in for comprehension. Maybe try an every pupil response tactic like thumbs up/thumbs down or bring in a bunch of whiteboards and markers with a tissue to wipe clean so every pupil answers. . .
A GREAT hands-on lesson I observed. . .
- Try to incorporate a HANDS-ON activity ~ something with manipulatives. I observed one lesson on the 3 types of rocks. The teacher had the students closely read 3 types of rock articles. The students worked in pairs reading it. The teacher asked questions about the article in a fun way – using the whiteboard and a quick Jeopardy-style game, and then the teacher prepared baggies of different colored play dough pieces for each student. Balling the 3 dough colors up slightly created sedimentary rock ~ the play dough colors were still visible. Putting more pressure on the dough by holding it down with a palm made metamorphic rock, and the colors slightly merged. Rubbing the play dough pieces together to “heat” it up and blend the colors created igneous rock. This truly taught the students the difference between the 3 rock types.
- If you can teach a science lesson as your demonstration lesson, Steve Spangler Science has excellent whole-class lesson kits you can purchase if you’re willing to spend a little money. Something fun and hands-on will excite the students, but don’t forget to set the ground rules and expectations for behavior ~ “the expected behavior.”
Get students working collaboratively ~ for example, Jigsaw!
Jigsaw is an impressive way to teach ~ and color code it! Here is an example. Let’s say you are teaching “marking up the text for deeper comprehension,” focusing on finding the main idea and details, and your topic is 5 different U.S. Presidents. You will pass out article #1 (a short article) so each student has a copy, and YOU read it with the students. (I have children’s search engines on my Student menu, and you can easily find kid-friendly articles there!)
YOU model pinpointing the main idea by THINKING ALOUD. YOU pinpoint 3 key details BY THINKING ALOUD ~ underlining details ~ and marking up the text. YOU write your answers on the board how you want THEM to do it.
Have 4 more articles of 4 more different Presidents of reasonable length for 4 different EXPERT groups (consider time constraints and grade level) ~ one article per group. You have 4 groups, so use 4 different colors. Have the students count off 1, 2, 3, 4, 1, 2, 3, 4, etc. Group 1 works off the yellow paper and studies Lincoln. Group 2 works off of the orange paper and studies Washington. Group 3 red paper, etc. (Don’t forget this is an elementary school, and you want to show some organizational system.)
Prepare on the papers the task YOU just modeled. Again, it could be as basic as marking up the text, stating the main idea and 3 details of your article. The like-colored EXPERT groups read together and learn about their President. They have to be sure everyone in the group knows the main idea and 3 details. They help each other write these on their papers. NOW THEY ARE AN EXPERT GROUP on THIS President.
Meanwhile, you are circulating the room, listening in, coaching.
Then students reassemble in different colored groups and TEACH EACH OTHER their President. . .
Wrap up with an exit ticket, such as name 3 facts you learned today, what question you would ask one of the Presidents we discussed today, or how did you feel about the Jigsaw strategy.
Use “exit tickets” and self-assessments
- To check for understanding, create an “exit ticket” that students must answer. It can be something such as, “What connections did you make today?” or “What one new fact did you learn today?” or “Define ______.”
- End with a self-assessment! Whatever and however you teach, ALWAYS spiral back to the objective. Have students give a thumbs up if they feel they have met the objective, a sideways thumb if they still need to go back, and a thumbs down if they feel lost.
![]()